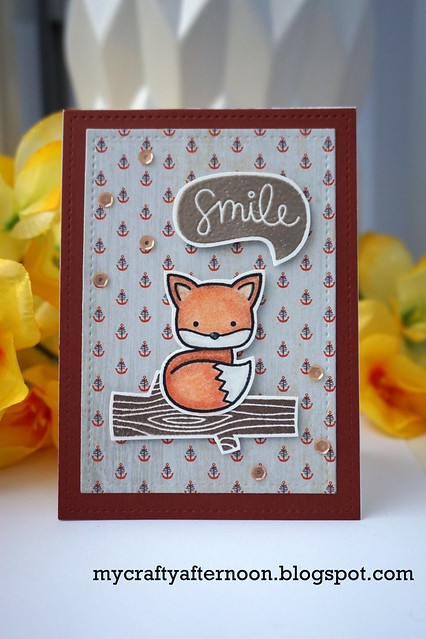
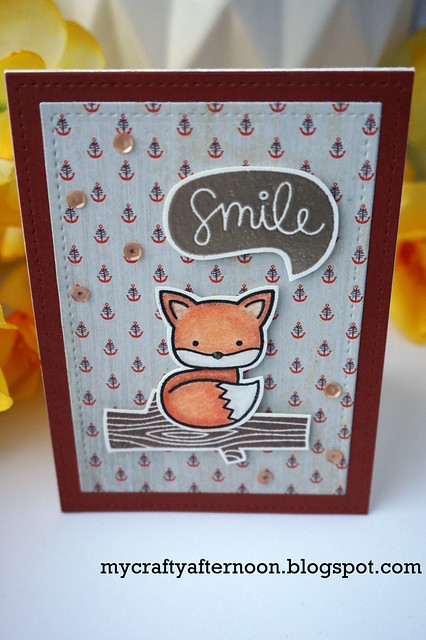
Hi there! Lately, I've been in a fall kind of mood, hence today's seemingly out of season card. This time of the year, I'm usually yearning for spring blooms and fresh colours. However, I love fall (especially Halloween) just as much as spring, and last October, due to a number of distractions, I feel like I missed much of the season. So now, in January, I've been drawn to fall stamp sets and all things orange!
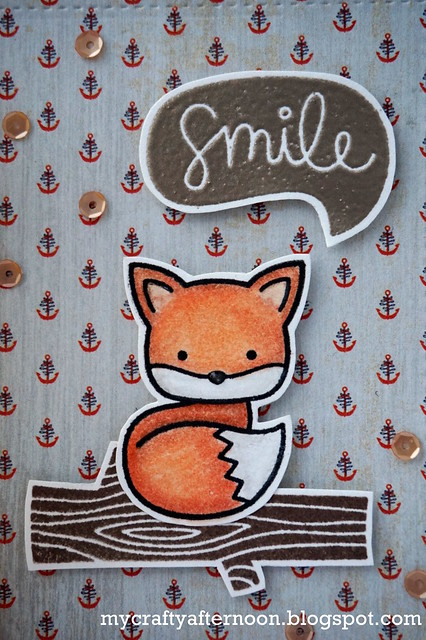
I made this card for a dear friend's birthday. For the background, I die cut some cute pattern paper featuring teeny orange anchors using Lawn Fawn's Small Stitched Rectangles dies. I stamped the cute little fox from Into the Woods in Versafine Onyx Black ink, coloured him in with coloured pencils, and blended out the pigment with odourless mineral spirits. I added Glossy Accents to give his nose some shine.
I stamped the log with Memento Rich Cocoa ink and heat embossed the sweet "Smile" speech bubble with Ranger's Platinum embossing powder. Finally, I adhered the background to some dark orange card stock, mounted the stamped elements with foam tape and added a scattering of sequins.
Supplies
- Lawn Fawn dies: Large and Small Stitched Rectangles
- Basic Grey Adrift paper pad
- Lawn Fawn Into the Woods stamp set
- Coloured Pencils: Prismacolor, Koh-i-Noor, Faber Castell, Derwent
- Deserres odourless mineral spirits
- Ranger Glossy Accents and Multi-Medium Matte
- Ranger Platnum embossing powder
- Inks: Versafine Onyx Black, Versamark and Memento Rich Cocoa
- Pretty Pink Posh 4mm sequins in Sand
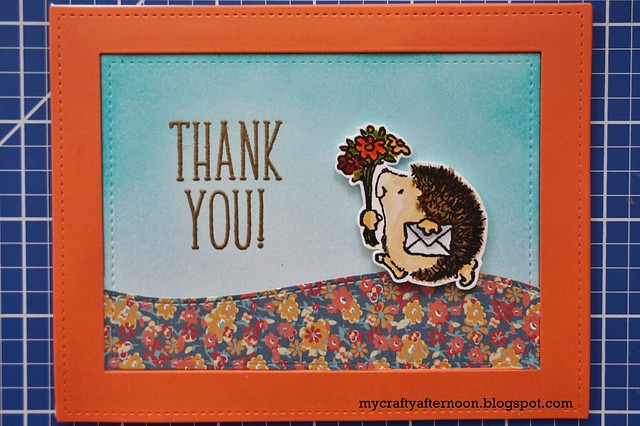
Hi there! This is the final thank you card share from my fall engagement party.
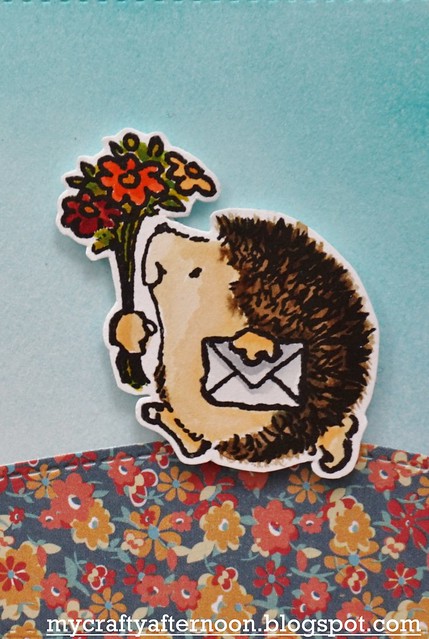
To create this card, I started off by stamping a cute hedgehog from the Penny Black Party Time stamp set on some Strathmore mixed media paper. I used Distress Inks to watercolour him in, and made sure that the flowers matched the colours of the patterned paper I planned to use for the rolling hill. I used Lawn Fawn's Large Stitched Rectangles and Hillside Border dies to die cut the hill, sky backdrop and the frame. To create a dimensional frame, I die cut 5 of the frames and glued them together. I gold heat embossed the Thank You sentiment on the sky backdrop, which I coloured in with Tumbled Glass Distress Ink using a mini ink bleding tool. To give the little hedgehog more dimension, I adhered him with foam tape.
Supplies
- Penny Black Party Time stamp set
- Lawn Fawn Violet's ABCs stamp set
- Lawn Fawn dies: Hillside Borders, Large Stitched Rectangles
- Gold embossing powder
- Distress Inks: Walnut Stain, Antique Linen, Dried Marigold, Wild Honey, Fired Brick, Ripe Persimmon, Black Soot, Mowed Lawn, Crushed Olive.
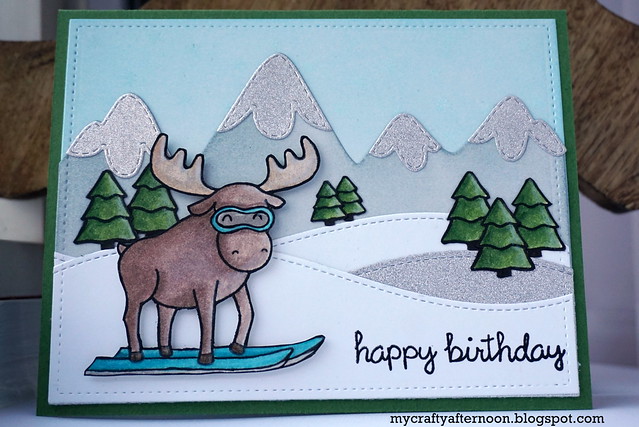
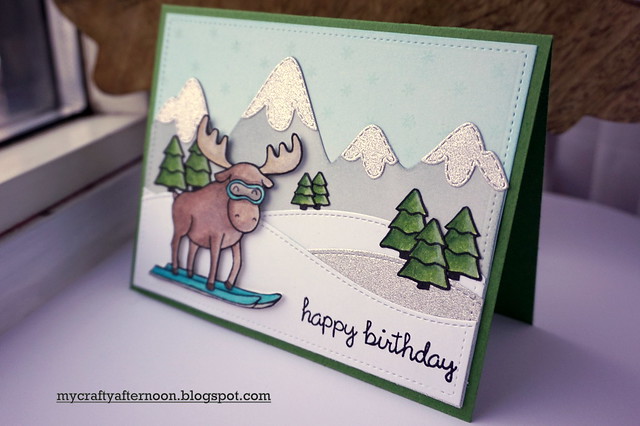
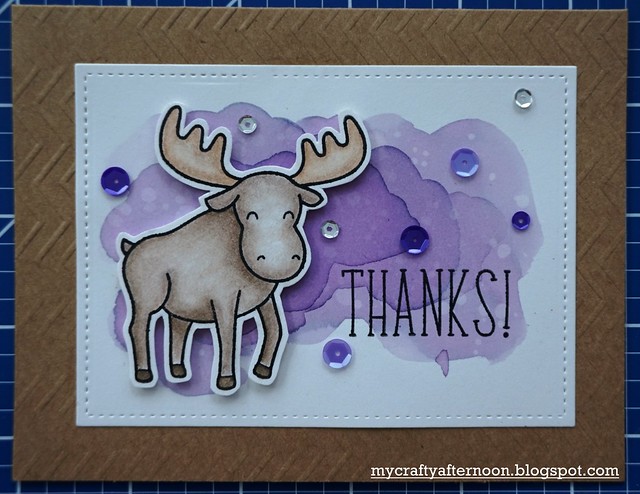
Hi everyone! I made this winter wonderland card for my dad's upcoming birthday. It's at least his idea of a winter wonderland, as he's an avid skier and has several ski trips planned this season.
To put together this card, I first stamped out the moose from Lawn Fawn's Critters in the Arctic (one of my most used sets) and was careful to wipe away some of the ink from around his eyes, so that I could draw in a pair of ski goggles. I also added some skis to his hooves. I coloured him, as well as many (oh so many) pine trees from Lawn Fawn's Yeti Set Go, with coloured pencils and blended them out with odourless mineral spirits. I also added highlights with a white pencil, and love the effect it gave.
For the background, I die cut several hills with Lawn Fawn's Hillside Border dies, and a mountain range with the Snow Capped Mountains die from Mama Elephant. I used Distress Inks to colour in the ski and the mountain range, and die cut the snow caps out of some silver glitter paper. To tie the silver glitter in, I die cut one of the hills from the same paper, and it think it gives it a really cool patchwork effect. I glued everything flat except for the moose, which I covered in a ridiculous amount of foam tape.
The inspiration for this card actually came from the current Lawnscaping challenge, Winter Wonderland.
Update: This card was Spotted and Hearted, and an Honourable Gnome on the Lawscaping Blog!
Supplies
- Lawn Fawn Stamps: Critters in the Arctic, Yeti Set Go, Happy Everything
- Ranger Glossy Accents
- Lawn Fawn Hillside Border Dies and Large Stitched Rectangle Dies
- Mama Elephant Snow Capped Mountains Dies
- Silver glitter paper
- Distress Inks: Weathered Wood and Tumbled Glass
- Coloured pencils (a variety of brands) and odourless mineral spirits
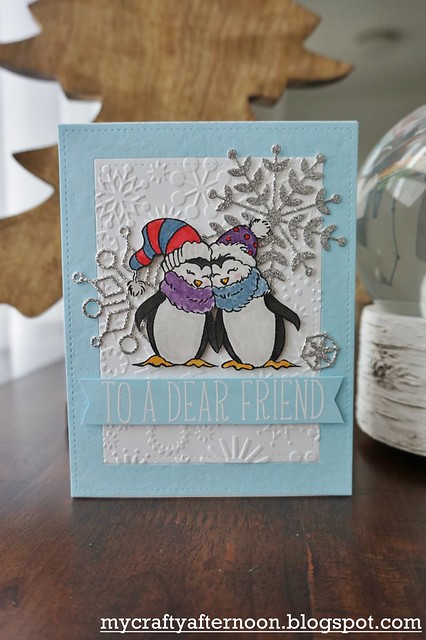
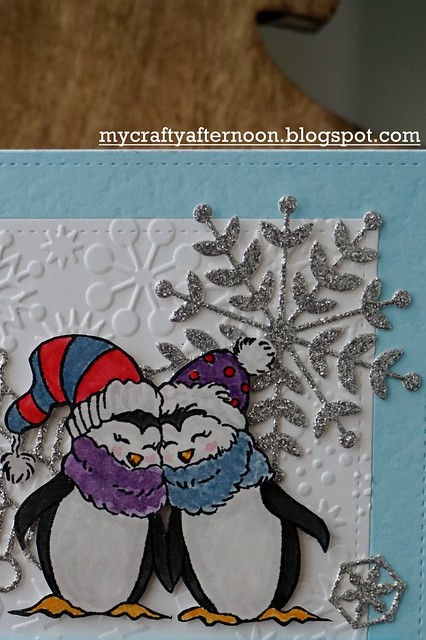
I made this card to give to a dear friend this winter to thank her for her friendship and support throughout the years.
I stamped the Penguin Pair from Stampendous in Versafine Black Onyx ink and watercoloured the image using Distress Inks. Once dried, I added glossy accents to their little beaks. For the background, I used a snowflake embossing folder and added a wide frame in light blue cardstock. I also added a few snowflakes die cut from glitter paper. My custom white embossed sentiment was created with Lawn Fawn's Violet's ABCs.
This card is entered in Simon Says Stamp's Flickr challenge #35, Wonderful Watercolors (*watercolours*..ehem).
Supplies
- Stampendous Penguin Pair woodblock stamp
- Ranger Glossy Accents
- Lawn Fawn Violet's ABCs stamp set
- Cuttlebug embossing folder
- Simon Says Stamp snowflake dies: Kinley, Rylynn, and Kate (just the centre)
- Distress Inks: Dusty Concord, Stormy Sky, Festive Berries, Fired Brick, Wild Honey, Worn Lipstick and Black Soot
- Brazzill Basics Cardstock
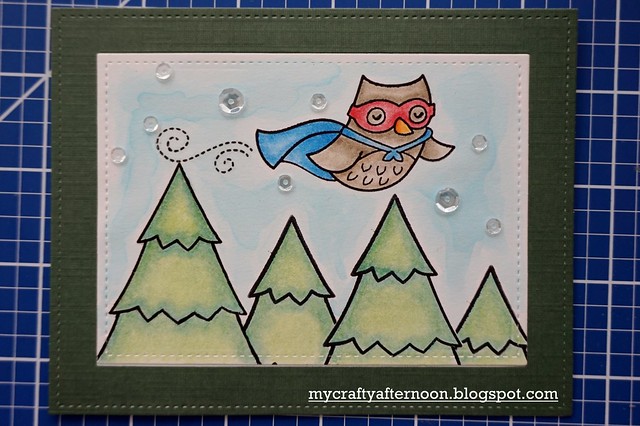
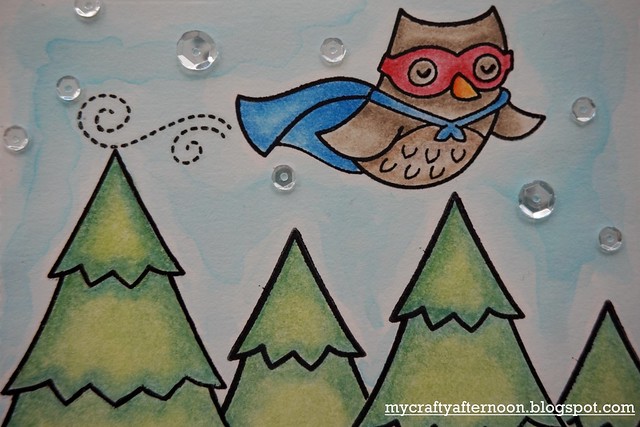
Needless to say, I made a ton of thank you cards for my engagement party back in October (see Part 1 and Part 2). You'll notice that since then, I've slightly improved my card photography style.
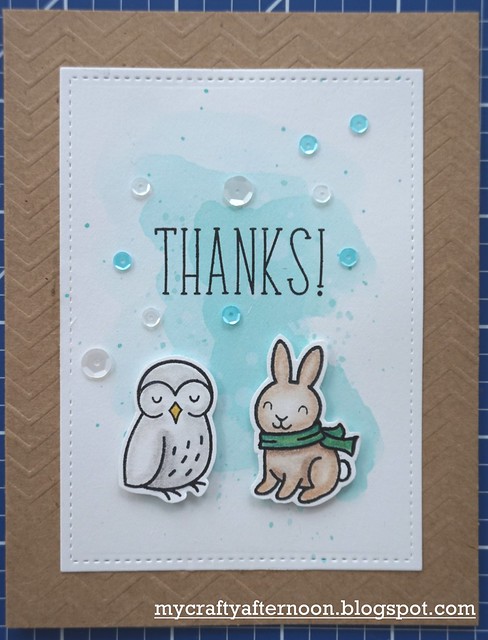
For this card, I used the pine tree from Lawn Fawn's Critters in the Forest and the owl from Critters in Costume. I love that I can use this stamp set for non-Halloween cards. I coloured the images in with coloured pencils, and blended them with odourless mineral spirits. To add some interest to the sky, I used Tumbled Glass Distress Ink to watercolour in three layers, allowing each layer to dry before the next application. I finished the card off with some sparkling clear sequins from Pretty Pink Posh and added a dark green cardstock border to complement the trees.
Supplies
- Lawn Fawn Stamps: Critters in the Forest and Critters in Costume
- Tumbled Glass Distress Ink
- Coloured pencils: A combination of Koh-i-noor, Faber-Castell, Derwent and Prismacolor
- DeSerres odourless mineral spirits
- Pretty Pink Posh sparkling clear sequins
- Lawn Fawn Large Stitched Rectangle Stackables
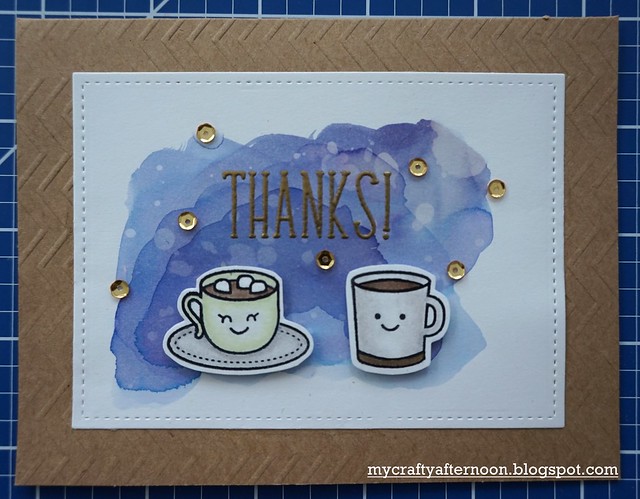
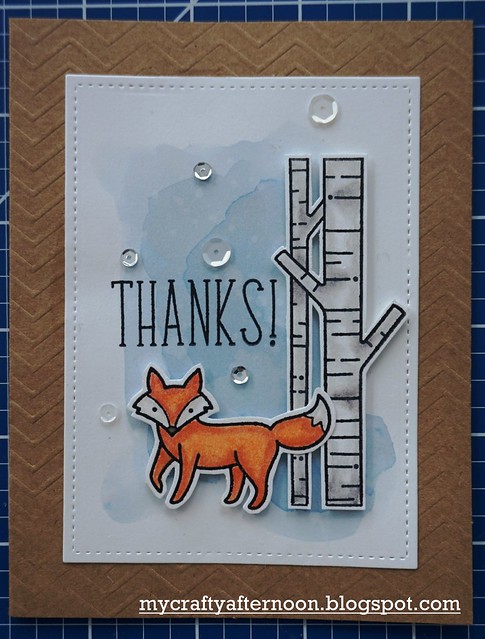
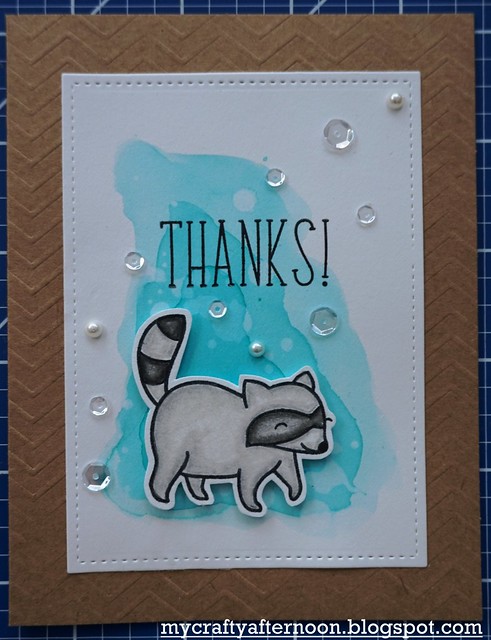
Today, I'm sharing the rest of the thank you cards I made for guests of my engagement party (see Part 1 here).
As a novice card maker, here are a few things I learned in the process:
- Do use a similar style for all of your thank you cards (e.g. the same type of background, the same coloring medium, etc.). You don’t have to think as hard, especially when your crafty afternoon becomes your crafty midnight.
- Don’t do watercolour backgrounds on non-watercolour paper. That one’s a little obvious. I used Strathmore Mixed Media paper for my Distress Ink watercolouring, and my backgrounds warped enough that I had to perform extensive card surgery. After adhering my backgrounds to the card bases with tape runner, I ended up gluing down the copious ripples with liquid glue.
- If you have to glue down your non-watercolour paper that you made the mistake of watercolouring on, do use Ranger’s Multi-Medium Matte glue. That stuff was my saviour, for being both strong and matte.
- Do have some backgrounds stashed away for emergency use. A couple of the backgrounds for the cards were from my stash, and I ended up using them when I had to trash some of my too-warped watercolour backgrounds.
Supplies
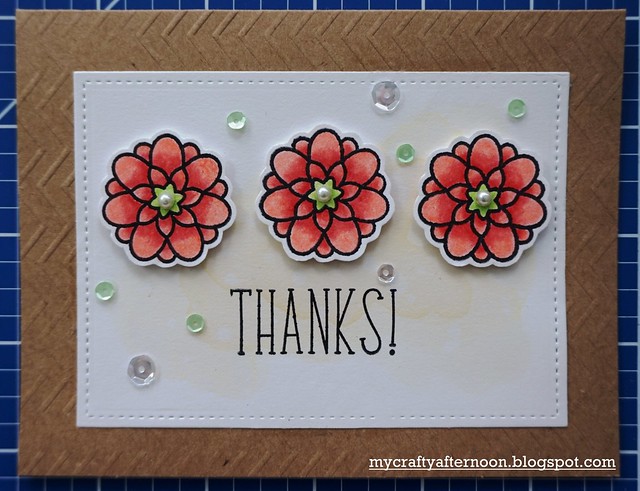
- Lawn Fawn Stamps: Hedgehugs, Critters in the Forest, Love You a Latte, Flutter By, and Violet's ABCs (for the Thanks sentiment)
- Distress Inks: Wild Honey, Chipped Sapphire, Antique Linen, Tumbled Glass and Peacock Feathers
- Coloured pencils: A combination of Koh-i-noor, Faber-Castell, Derwent and Prismacolor
- DeSerres odourless mineral spirits
- Pretty Pink Posh sequins and Recollections pearls
- Lawn Fawn Large Stitched Rectangle Stackables
- Colorbox gold embossing powder
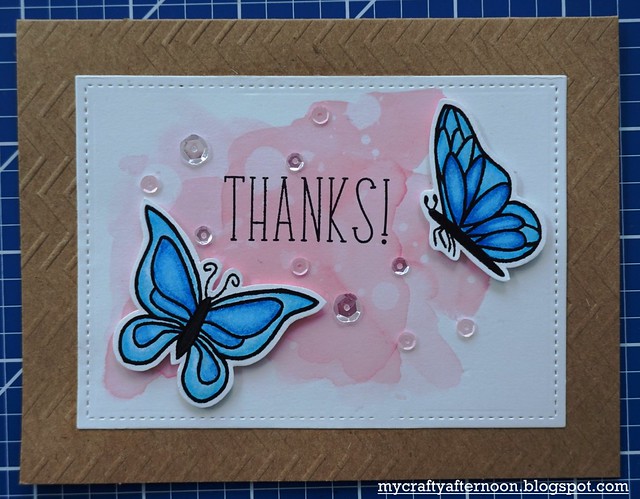
Hi everyone! For my first post on My Crafty Afternoon, I’m sharing a thank you card series I did in October of last year. I gave these thank you cards, along with some cookies, to friends and family who attended an engagement party held for my fiancée and I.
I chose to make individualized cards (rather than replicating a card design) but with a similar feel.
For most of my backgrounds, I used a Distress Ink watercolour technique inspired by Nicole of Unify Handmade. I applied three layers of the same ink, waiting for each layer to dry before applying the next, which created a dimensional look. I coloured the Lawn Fawn critters with coloured pencils blended with mineral spirits. Finally, I finished the panel off with a scattering of sequins and pearls, inspired by Nichol.
In my next post, I'll share the rest of the thank you cards, a few "lessons learned."
Supplies
- Lawn Fawn stamps: Critters in the Arctic, Flutter By, Joy to the Woods, Critters in the Forest and Violet's ABCs (for the Thanks sentiment)
- Distress Inks: Dusty Concord, Worn Lipstick, Stormy Sky and Peacock Feathers
- Coloured pencils: A combination of Koh-i-noor, Derwent, Faber-Castell and Prismacolor pencils
- DeSerres odourless mineral spirits
- Pretty Pink Posh sequins and Recollections pearls
- Lawn Fawn Large Stitched Rectangle Stackables